One of the big life enhancements I have had in the last few years was mounting a computer in the Kitchen above the sink. I realized that there is an inherent hazard in mixing electronics and kitchen activities but I maintain a strong belief that this can also be a very beneficial mix. Having openSUSE available to me, with all its application and reliability goodness has been a life-enhancer for the kitchen.

The Accident
Whilst cleaning dishes in the kitchen one day, I was overcome with excitement about something I had seen on the computer and without thinking transitioned my wet, dishwater-soapy hands right from the sink to the keyboard and thoroughly saturated the K400+. Realizing what I had done I grabbed a towel and to no success, I tried to dry the thing off. I let the keyboard dry for a few days, having it placed in front of a fan for a portion of that and there was still no improvement. I did try it again a few weeks later, same problem of multiple keys being sensed when one key was pressed. This would not do.
Instead of fixing it right away, sort of considering it a lost cause, put it on my pile of broken things to get to it at another time. In the intermediary time, I decided to use this old full sized Apple keyboard. This was from the iMac G5 era of machines, Clear base that acts like a tray to collect all kinds of debris. Really, a terrible design but was cool back in the day, I suppose. The short USB Cable on the keyboard was causing a continual increase in frustration. That combined with the keys are a lot heavier to push than the broken Logitech keyboard was so when typing, I would often not properly press a key completely and have to fix my error.

I continued using this keyboard, though its function had been as an emergency or special project keyboard. They kitchen computer was in no way a special project but I had been using it in an emergency fashion for far too long. I missed the wireless capability a lot and the handy touch pad was also not there for me to quickly scroll and click to something.
After recording an episode of DLN Xtend, I decided it was time to disassemble the thing and see if I could fix it. I have seen many retro computer keyboard repairs on YouTube where the keyboards would have been considered a lost cause by most and they were successful, what is really the difference, outside of them being experts with success and me being one to more often break things then actually fix with success.
Disassembly
Despite my misuse and abuse of this keyboard, id still did (and does) look good and I did miss the feel of that rubber-dome, laptop-style keyboard.

I brought the keyboard to my workbench and gathered my tools. Not much was needed a screwdriver and a triangular plastic case opening tool as this keyboard was likely to have many snaps that are just waiting to be broken.

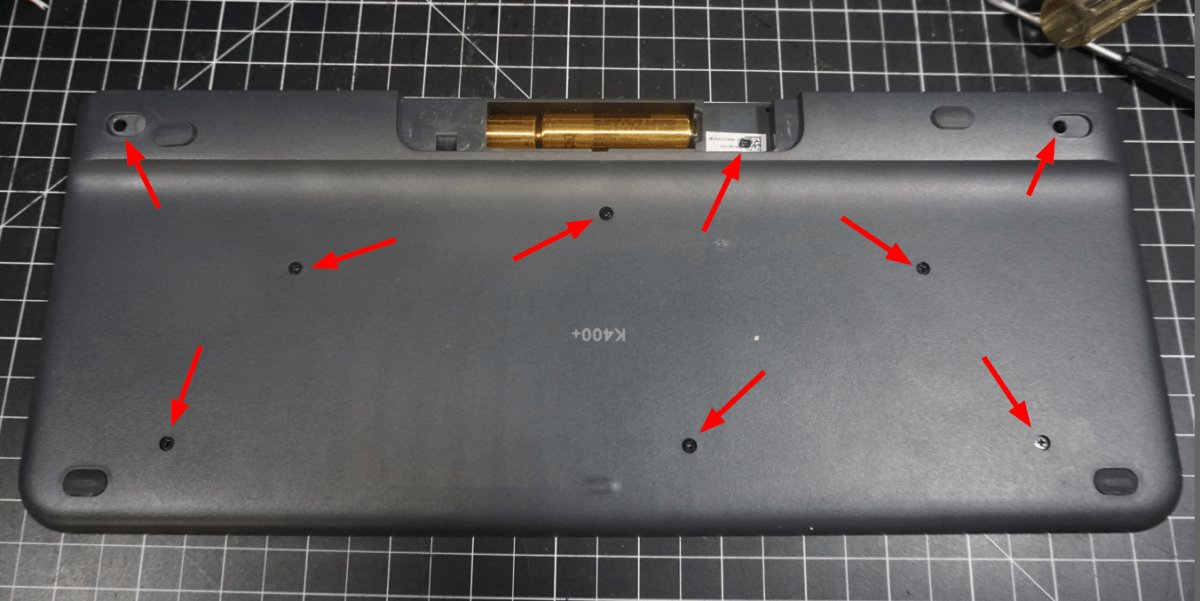
The screws that hold this together are on the bottom with a total of nine screws that keep this together. Three of the nine screws are hidden. Two under the rubber feet at the backside of the keyboard and one under a sticker with the serial number. There are numerous ways to remove the foot pads, tweezers, flat-head screw driver, fingernails if they are long enough, just be careful not to get the sticky side dirty.
Using the plastic case separator tool, I pried keyboard apart, fully expecting the keys to explode all over the place. Surprisingly, they are nicely retained in the top half of the case. Below the keys sits a silicon like rubber pad. Below the rubber pad is what looks like mylar with a lot of traces or circuits somehow etched, perhaps printed in the surface.

Using isopropyl alcohol cleaned the top of it and I could test the keys by pressing on the circles upon which the keys would normally push down through the rubber domes. I was still getting odd results. Pressing the “J” key would print “je” on the screen and so forth. I cleaned several times, getting slightly more aggressive with no success at each subsequent test.
I could see a reddish-brown discoloration on the mylar and the isopropyl was seemingly not successful in removing it. I was about ready to give up when I made a closer observation of the mylar and noticed there were layers. There were, in fact, three layers which then made it evident as to how this keyboard works.

This answered my question on how this particular keyboard works. When the key presses the top layer of mylar, closes the gap and makes contact with the bottom layer of mylar.
I was also able to easily clean what discoloration remained. I very carefully, with a synthetic towel and isopropyl, cleaned the layers of mylar taking great care in not wrinkling anything or rub too hard. When complete, I held the bits apart to allow the solvent to dry before testing once again.
Still leaving the silicon rubber dome layer off, I tested the key presses with success. Next I set the silicon rubber layer down, and tested the key presses, again with success. At this point, I am feeling pretty excited and took the top half of the keyboard case, pressed it down firmly to allow the snaps to engage and gave the keyboard a full test. Surprisingly, all the keys worked as expected. It was a successful repair!
Final Thoughts
Many of my repairs do not go well. I would say I have about a 40% success rate of first time go with things. That actually might be a bit generous, as sometimes, I have to fix things a few times before it sticks. This is something I should have fixed months ago. My fingers are so relieved to not to have to hammer down on that old Apple keyboard and also to not have to keep it on top of the coffee maker to use. I have freedom to roam about my small kitchen once again. I must, however, be more careful as to not mix dirty, soapy dishwater and the keyboard again. I don’t want to have to perform this fix again.
Reference
Logitech K400+ Keyboard
openSUSE.org Home
Linux in the Kitchen | Life Enhancement Blathering
Informative post!! I liked the way you shared your experience of water spill with us. It will give enough knowledge to Logitech K400+ keyboard users to deal with such situations. Keep sharing kinds of stuff!!
I’m glad it was beneficial to you and hopefully more. Thanks for sharing!
great pos6t1 j9us6t whmat i needed after s6pilling cofee. can you tell/ thmank you111.
Good luck! I think it’s a great keyboard and worth fixing.
I just found this article today. This is a lifesaver, as I had a similar spill (keyboard was on the kitchen counter and made contact with a growing puddle of condensation from a Big Gulp tumbler. I thought i had to trash the poor thing, but it had been so useful. Initially tried to blow out the water with compressed air, but no effect. SO lucky I read your story, and grabbed the isopropyl off the shelf and wiping down the layers. Worked like magic, thanks so much, I have my keyboard again. <3
That is fantastic news! Thank you for sharing your success!