I read a lot of negativity about YaST on the webs, Reddit, YouTubes… other places… and I wanted to write a counter to all those negative statements. Why? YaST was the biggest selling point for me to go openSUSE when I departed the Mandrake / Mandriva world about 10 years ago (at the time of writing). I use YaST regularly and have grown to truly enjoy the tools for system administration. I am not good at remembering the various commands in the terminal to do a thing even though I do take a number of notes. YaST is just so quick to get to a solution, especially when there are lots of little steps involved. I originally was going to make it 8 reasons, then 10 but after getting to 16, I decided I had to pare it down and will probably have to do follow up blatherings on the various modules. Here are my reasons why YaST makes openSUSE Awesome.
Consolidated Control Center of Tools
This is my primary love for YaST. I know I can go to one place and get to any system level function for my computer. I have this general requirement that I want all my tools in one spot, I do not want to have to hunt for the proper tool to accomplish a specified task, with YaST, I get that and managing my openSUSE machines is super convenient. I don’t have to remember any esoteric commands in the terminal, as much as I love the terminal and the power it provides. I often cannot remember the commands to fix or alter a thing. This is especially true with functions I do not perform regularly.
openSUSE set the standard for me with YaST, for me to consider any Linux distribution, I must have a “Control Center” for all my system management tools. Basically, at this point, I am spoiled and although I can get along fine with other distributions, I never feel fully comfortable with a system that doesn’t have this luxury item.
Software Management Modules
I’m going to lump these four modules together because they are largely interrelated. I probably use these modules the most of the YaST tools. They are just so convenient.

The four modules here are all incredibly useful. The Software Management is a kind of “old school” method for managing your system software but this really exposes the full power of [RPM] package management. Here you can search for specific packages, select to install, remove, Update, protect or even select to make “Taboo.” I absolutely love how powerful this software management module is.

Very tightly related and you can access this through the previous module is the ability to configure software repositories. Here you can, at a glance, look at the repositories you have installed, modify the state of whether or not they are enabled and if you want them to Auto-refresh. It is trivial to add repositories from this module as well which is the next part I want to highlight.

The Add-On products module is great for quickly adding community repositories to your system. The important one for me in this list is Packman, which has the multimedia codecs that provides to you what you need for a media-rich computing experience.


The Media Check module is great for making sure the media you download passes the checksums. Unless you can remember the commands in the terminal, this is a great option and easy to use. I give this hearty handshake and pat on the back for convenience.
Partitioner
This is a great tool for managing your partitions. What I absolutely love about this tool is the ease of managing BTRFS RAID devices. The set up was so simple and took all the mystery out of what I needed to do to get a perfectly working system.

There is so much depth to this module that I can’t do it justice in this write up. Suffice to say, this is a fantastic tool that will get your preferred storage configuration, no matter how unique it may be.
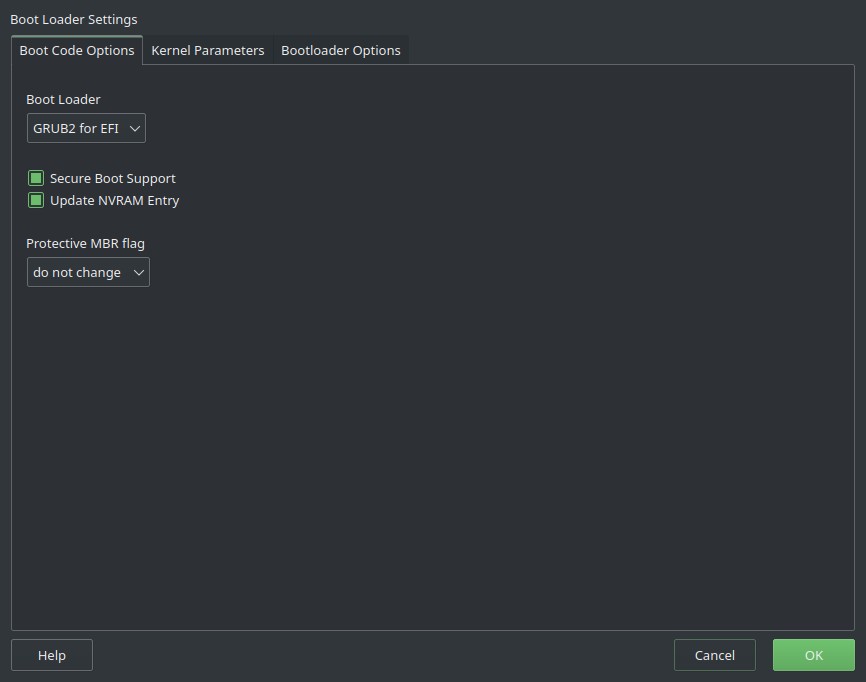
Boot Loader Settings
There are three options, broken down into tabs on this module. The first is Boot Code Options where you can set the boot loader options, whether or not you want Secure Boot Support and to update the NVRAM Entry. There is also a drop down for protective MBR flag. I generally leave this as default.
The Kernel Parameters tab is fantastic. If you need to pass any variables to the kernel on boot, here is the place to do it. Even cooler is the CPU Mitigations options. You can leave it on Auto, or switch it to Auto + No SMT which will disable Simultaneous Multi-threading, Off, for no mitigations and Manually which does not specify a mitigation level but leaves it at the kernel default but allows you to add your mitigation options in the Kernel Command Line Parameter.
The Console resolution is a feature I have used with some odd hardware combinations and you can easily specify a Console theme too. The Serial console is something I have not yet used but when checked it redirects boot output to a serial device like ttyS0. Also, very cool for some appliance like configurations.

The last tab, Bootloader Options is another fantastic set of tools. This allows you to change the timeout for Grub to boot the default selection or for you to make your selection, to probe for a foreign OS, even hide the boot menu. Here you can select the default boot selection and even protect the boot loader with a password.

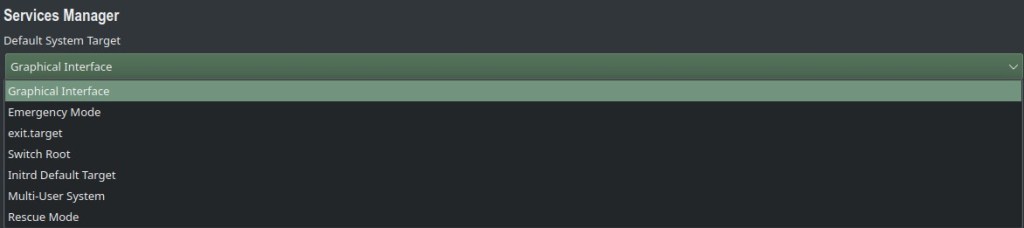
Services Manager
Not only does it list the services with description but it also gives you the current state and the start parameter setting. With simple drop downs and buttons you can select to start, stop and specify what start mode you want. This is such a handy tool and when I can’t remember the service name or I have a vapor lock in the brain, I can use this tool and very easily make any changes.

Another neat feature is the selection of the default target system. I always run a Graphical interface but you can very easily select other options that may suit you.
Security Center
This is a huge and very awesome module. This deserves an article unto itself or perhaps a whole series of articles on how cool it is so I am just going to brush ever so briefly on some of the settings. The first screen is an overview of your security settings. I have a number of Red X’s here, let’s not focus too much on that. This show the most important security settings. You can easily change the value by clicking on the link to the associated option.

The next section is the predefined configurations. Here you can specify the security profile that suits your system role.

For the password settings, you can perform a number configurations for what you will allow for passwords, encryption method and age of passwords restrictions. I have mine set a little loose but this is also default. I don’t automatically expire my passwords because I would get highly irritated with the system administrator and likely fire him.

The last section I am going to briefly cover is the boot settings. Here you can very easily change the interpretation of Ctrl + Alt + Del on your system to “Halt” or just flat out “Ignore”. The hibernation selection is also interesting as you can make this more or less restrictive .

The other modules are great too but do require more work than I am willing to put into a “Top 11” blathering.
User and Group Management
This is, by far, the most comprehensive user control application I have ever seen. I am head-over-heels on the number of controls this gives you. I am only barely scratching the surface with these controls and really should learn more of it but the basics are all there. On the “Users” Tab, you can add, edit or delete the selected user.

Like the Security module, this could be a whole series of articles in what you can do with the User and Group Management. Here you can specify the details about a user. This is such a nice interface with quite literally all the details you need to make any necessary alteration. I love all the controls. Here is a fun note, because I have use NFS for sharing files, I like to keep all the users on all the machines on my network with the correct User IDs. It is no problem at all to change the user ID for a user and everything will adjust appropriately on your openSUSE system.

There are a lot of details in the password settings, SSH Public Keys and Plug-Ins that you can adjust for your organizational requirements. This is very much worth its own stand-alone article.
Alternatives
This is another super cool tool. If, lets say you don’t want your Display Manager to be SDDM, you can go into this and change it from SDDM to whatever you have installed, like XDM or LightDM, whatever suits you. This is worth playing around with some more and thanks to BTRFS + Snapper, I can break things without consequence.

Filesystem Snapshots
Because I am using BTRFS with Snapper, I am able to very easily manage my snapshots with this GUI. I normally do this in terminal because it is an easy command but this allows for you to visually see and make modifications to snapshot as needed. This is just, overall, a great tool.

Systemd Journal
Ever since Systemd, I can’t ever remember the proper syntax for reviewing all the system messages. This here, makes viewing them, filtering and searching incredibly convenient. This is such a great tool for checking your system messages.

Ncurses Interface
Last, but by no means least, is the Ncurses interface for YaST. Should you, for some reason, need to access a remote system that may be headless or just on the other side of the building and you are too lazy to sashay your way over to it, you can very easily manage, completely, a system through the glorious terminal. I tend to use this rather frequently with remote devices, like my server or a RaspberryPi that is stuffed someplace. This is also awesome because no longer are the days of having to mess with all the weird Linux commands to set up a wireless connection when you can use the comprehensive, yet a bit clunky, Network Settings application and very easily set up your wireless connection before unteathering it from the Ethernet.
This Ncurses interface is an absolute lifesaver for a guy that is not good about remembering his terminal commands but is stuck in the terminal. I am so glad openSUSE / SUSE keeps this tool updated and usable. I tip my hat to you and say, “well done.”

Final Thoughts
YaST is just so awesome, I know it has its critics, I agree that it can be improved, as far as some of the user interface layout and such, but it is incredibly usable, the built in “help” is very informative and every necessary system level function can be performed in YaST. It should also be noted that there are more modules available for YaST than I have installed and there is also a Web interface for YaST.
I also want to point out, my top 11 reasons YaST is awesome misses out on numerous other reasons YaST is awesome. Check out this page and tell me the things I SHOULD have covered in this article instead.
To the critics of YaST that say it should go away, I respectfully disagree. I love how convenient this makes my personal administration so much easier. I only have to remember to type, “yast” and I can either click or tab away to my solution. Thank you, everyone, involved in keeping YaST the best system administration tool ever created.
I just wish yast could update Tumbleweed
It only updates Leap ?
It only updates Leap ?
I have done updates to Tumbleweed within YaST software successfully. I can’t say for sure if it is the proper way but I can verify this.
Hi CubicleNate,
Great article. I also use these modules that you mentioned a lot! Other modules that are worth mentioning:
Hardware Information – for debugging
Printer / Scanner – for setting up printers / scanners
Date and Time – for selecting time server mirors
Network Settings – when encountering issues with Network Manager
Firewall – limiting access or granting access to the Firewall
I totally agree and I did have the Network settings and printer / scanner modules on this as well, but I felt like 11 was already too many reasons. I think that MANY of these modules deserve their own blatherings. In time… in time… Thanks for the feedback!
It would be nice to have a module to manage and setup multipath in yast
How do you get dark interface in YaST?
I use a dark theme in Plasma, but YaST always keep the light theme.
BTW great article!! 😉
I changed the theme of the root user to use a dark theme. That makes YaST look correct. 😁