Getting started with Home Assistant, you are presented with lots of options and there is a plethora of opinions to steer you in the “right” direction. The problem I had is that I was paralyzed by the options and, as a consequence, set back my adoption of Home Assistant in my everyday life. In an effort to make this as absolutely as simple and as easy as possible for the user, brand new to this. I am writing an incomplete guide for which I will plug in the other bits in separate articles. For this, I will focus on how I started with the bits of home automation tech I already had sitting in a plastic flip top tote. There is no knowledge of Docker or Virtual Machines required to make this work.
To some degree, all home automation is a kind of science experiment. Even if you buy into the latest and greatest system with all the “big-tech” endorsement, they too have their points of failure. I would also argue that their points of failure are far more catastrophic than a self hosted, Home Assistant solution.
Before taking on any sort of home automation, be mindful that you are taking on a technical liability. There is no computer or no appliance that is self maintaining. Like any computer system, this will require updates and occasional intervention.
Materials
Assuming you want to dip into Home Assistant with the least amount of financial commitment, I have two general recommendations: Using a Raspberry Pi 3 or Pi 4, because, who doesn’t have one of these sitting in a drawer waiting for a suitable project; And, alternatively, if you have generic x86 based, 64 bit, computer, sitting around and totally idol, this would also work. You might have a laptop with a broken screen or a wonky touch pad that will never sit upon your lap again that otherwise works. This too could be a great option to get it going on the cheap. For the sake of simplicity in writing this up, I am going to be using the Raspberry Pi route.
- Raspberry Pi 3 or Pi 4
- 32 GiB (or greater) Micro SD Card rated at Application Class 2 or better
- Micro SD Card reader
- Solid Power Supply for the Raspberry Pi
- Ethernet Cable
The next thing you need to make this a rewarding experience is something to control but this is NOT necessary to set up Home Assistant and make it useful, even at some level. Since I already had a bin of things, I will explain what I did setting up Insteon devices with Home Assistant. This included a Dual-band modem, some wall switches and plugs.
Download
I set up a Raspberry Pi 3 because it was available. It should also be noted that the official documentation says it is “okay” to use a Pi 3 if you have one lying around. That was enough of an endorsement of the technological choice, so I gladly went with it.
The Home Assistant project recommends using Etcher and there is an AppImage for Linux.
Follow this section on the Home Assistant site. I was going to share my own process but this is just better and covers all the options.
First Run
Insert the Ethernet cable into the Pi and connect the power supply and turn it on. It will take a few minutes to boot up but when you do, navigate to the web interface using your favorite browser. In the address bar, type, homeassistant.local:8123. If you have a stricter network configuration, you might need to access Home Assistant at homeassistant:8123 or by typing in the IP address, http://X.X.X.X:8123 (replace X.X.X.X with your Raspberry Pi’s IP address). To find this you will have to log into your router and check the DHCP Service for the clients on the list. I would HIGHLY recommend you assign, a specific, unchanging, static IP to your Home Assistant server. Especially if you choose to use any MQTT services.
Next, go through this On Boarding Page that gives you a great rundown on the initial setup. Also, if you have any “smart devices” to integrate into Home Assistant, this would a good time to do that.
https://www.home-assistant.io/getting-started/onboarding/
Necessary Add-ons
This is the part of this blathering that I wish I knew when going into this. There was lots of teeth grinding and keyboard banging to determine that I needed these add-ons. The first and most important is Studio Code Server.
Go to the Supervisor Section in the lower left corner.

In the lower-right corner, select,

Search for “code.”

And install the Studio Code Server. This is important because you are going to need to edit some of the yaml files at some point. Specifically for a particular fun thing you can do with Home Assistant.

The second Add-on you will want, for numerous reasons, a terminal with SSH. This is a handy tool and has many uses, especially if you run into troubles and need to poke around. I went for the official add-on but that is nothing against the community add-on.

Congratulations, Home Assistant is now operational and ready to start being used for home automation fun. Although, you are likely not doing much with it at this point.
Setting Up a Couple Cool Things
Local Pings to Machines
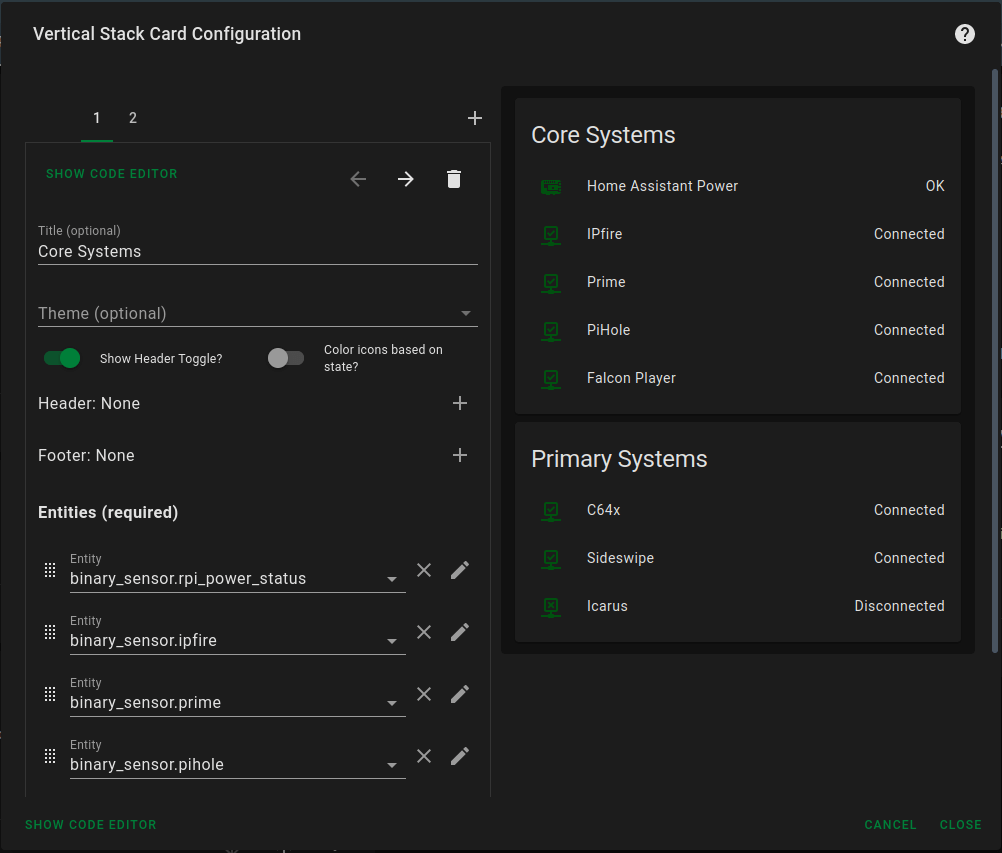
The goal here is to add a few lines of code to tell me whether or not a machine is connected to the network or if it has disconnected. This is handy for numerous reasons but primarily I use it as a quick snapshot of my core systems.

Using the aforementioned installation of studio code or using vim in the the terminal, navigate to ~/config and open configuration.yaml
There is just a small bit of code you need to add to the configuration file to check on your devices. The trick here is the proper formatting. YAML is a bit sensitive to the indentation. Here are the devices I am monitoring and you can modify it accordingly for you.
I was not able get the host to use host names instead of the IP address but since the machines I am monitoring have a static address, this isn’t a problem. The name can be whatever you want. The count is an integer value of the number of times it will ping the host and the scan_interval is the time in seconds between the that it will check again for the host.
#System Status
binary_sensor:
  - platform: ping
    host: 192.168.20.1
    name: "IPfire"
    count: 2
    scan_interval: 30

  - platform: ping
    host: 192.168.20.20
    name: "Prime"
    count: 2
    scan_interval: 30

  - platform: ping
    host: 192.168.20.6
    name: "PiHole"
    count: 2
    scan_interval: 30
In order to reload the changes, go to Configuration > Server Controls and check your configuration.

If the configuration shows as valid you can reload the specific portion of the configuration file. In this case, select “PING BINARY SENSOR ENTITIES” in the list.

The next step is going to add it to the Lovelace Dashboard. I have chosen to use the Entities card and add them individually. The usage of the dashboard is pretty intuative as it is all point and click or if you so desire, you can edit the YAML files using the code editor in the lower left corner of the box.
Without dragging this on, I highly recommend you just play around with the interface to see how it all works.
Insteon integration
I had a box of Insteon devices that have been unused for quite some time for various reasons. Setup for Insteon in Home Assistant was quite simple. I plugged the Insteon PowerLinc USB Modem into the wall and a free USB port on the Raspberry Pi and having already searched and found this page: https://www.home-assistant.io/integrations/insteon/ I knew that there is an integration already available with no fuss setup. To add the integration, navigate to Configuration > Integrations.

Then, in the lower-right corner, select “Add Integration”

A dialog box will pop up where you can search for new integrations. I searched, “insteon” and the integration was ready to be installed.

The devices will automatically populate, so long as you associate them to each other at the device level. If you know Insteon, this is already understood as what is required to use them. The option to Add a device override does not work as well as having the devices automatically be discovered at the modem level. Overall, I am happy with Insteon but there does appear to be a popcorn effect when activating scenes but for the time being, this is fine. I have limited Insteon to some specific key roles with higher wattage loads and am quite happy with it.
What I am using now
As of the time of writing, I am using Insteon and Tasmota devices with their integrations in Home Assistant. I am using a mix of these devices throughout my house and detached buildings. I find that they are working quite well. Each have their advantages and disadvantages.
My current issues with Insteon is, the expense of the switches so it makes it a bit cost prohibitive for me to implement everywhere and they tend to have a “popcorn effect” when used in scenes. More investigation on this is necessary. I have not yet found a solution to smooth this out. They are, however, very reliable and have a very premium feel to them.
The vast majority of the switches I am using are made by Linkind and have had the firmware upgraded with Tasmota. They are more feature rich than Insteon but because of that fantastic flexibility, I have had to take some time to re-configure the devices due to loss of programming configuration but it may have been due to using experimental firmware combined with some power fluctuations. As of today, it has been about six weeks since there was an issue. I currently have 10 Insteon devices and 54 Tasmota devices that are integrated into Home Assistant and it works so well. I have plans for more added convenience but it is going to take quite a bit of additional work to be lazy.
What I Like
Home Assistant is easy to set up, easy to use, has great functionality and is fun to use. The web application and the mobile application work extremely well. The user interface can be nicely customizable without any serious work from the user. The system is so extensible that if you want to add features, plug-ins, extensions or anything of the like if you have the skills.
Home Assistant gives you the freedom from relying on a cloud based service. If your internet flakes out or goes down for any reason, none of the core systems will be affected, unless you tie in third party services. This makes Home Assistant the ultimate home automation system.
Home Assistant is actively being worked on and improved regularly. There is an option to support the project financially by subscribing to the optional Home Assistant Cloud. By subscribing you receive remote control service as a perk of this support.
What I Don’t Like
There is really only one thing I find a bit irritating with Home Assistant. Devices that have died or have been replaced sill have an entry in Home Assistant. I have not yet found an easy way to clean up the database of things. It would be nice if you could somehow just remove dead devices easily.
Final Thoughts
I will have another article on setting up the various Tasmota devices I have been using. I have many weeks of studying, testing and validating my configurations that I will share. I think the best is to break down each device into their own write-up for simplicity.
Home Assistant is a system that I highly recommend for those that have a desire to automate their home and keep the control of the connected devices on the local area network only. It may be a little more work to set up but the added value of local control and management is far greater than the convenience of cloud centered devices.
References
https://www.home-assistant.io/integrations/insteon/
https://tasmota.github.io/docs/
https://www.digiblur.com/ – Fantastic resource for Local Home automation
4 thoughts on “Home Assistant for a Newbie”