
My most favorite computer build to date has been my Commodore 64 Impostor. It has truly been the best computer I have ever owned. Not because it is he fastest and most capable but because it hit all the right nostalgia buttons while at the same time meeting my computing requirements. The only real problem I had with it is that because of its small size, I needed some sort of external media bay and extra storage to accompany this glorious C64x. I needed to build a Commodore 1541 Impostor to fit right along side of it.
Selecting Features
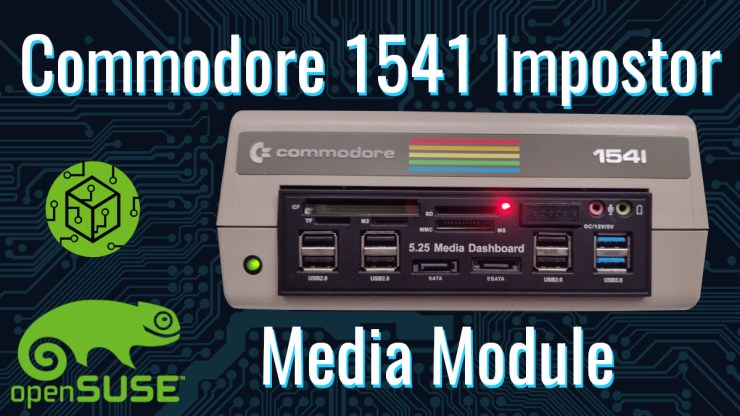
The main features I wanted to have in this media bay were additional USB ports and card readers. Specifically the Compact Flash, SD Card and MicroSD, the others were a bonus. Other features that I wanted to make sure would work are the SATA and eSATA ports. Initially, I wanted to have the mic and line out audio functionality but I ended up not using it, for now.
Designing the Component Cradle
I went through several design iterations to get the cradle to be exactly what I needed but the final result met my requirements. I can certainly think of ways to continue to improve it but what I have now works quite well.

Assembly
The challenge with this assembly was mostly in the cable management. Winding the cables around and zip tying them together as to not put stress on any of the connection points and have everything laying flat so that the lid can close free of resistance.


Using the C1541x
I have been very happily using this 1541 Impostor as a media module with my C64x. It acts largely as a USB Hub where I plug in my microphone and webcam, then as a convenient place to plug in USB drives, SD Cards and Compact Flash cards. I have only used the SATA port a few times but most of the time it seems that I plug in my 2.5″ SATA adapter into the USB3 port. I haven’t used the 2 TB internal storage much so far but I do intend on making better usage of it in time.

Parts List
| Description | Use | Loc | Qty | Unit | Total |
| C1541 Case | Project housing | eBay | 1 | $15.00 | $15.00 |
| Sabrent 10-Port 60W USB 3.0 Hub | Main USB 3 Hub | Amazon | 1 | $50.72 | $50.72 |
| 5.25″ Media Dashboard | USB, SATA, Media card reader | eBay | 1 | $25.95 | $25.95 |
| Car Dash Panel AUX Flush Mount, USB 3.0 3ft Male to Female Extension Cable | Replace IEC DIN ports on back | eBay | 2 | $11.15 | $22.30 |
| 90° USB 3.0 Type B Male to Female Printer Extension Cable Waterproof Panel Mount | USB Hub input | eBay | 1 | $7.99 | $7.99 |
| SAMSUNG 870 QVO Series 2.5″ 2TB SATA III Samsung 4-bit MLC V-NAND Internal SSD | Internal Storage | eBay | 1 | $174.99 | $174.99 |
| USB 3.0 to 2.5″ SATA III Hard Drive Adapter Cable/UASP -SATA to USB3.0 Converter | USB3 to SATA SSD adapter | eBay | 1 | $4.99 | $4.99 |
| 10-in 9-Pin (2×5) IDC Header Male to Dual Type-A Male USB 2.0 Motherboard Cable | 2 USB to male pin headers, drive media cards | eBay | 1 | $8.43 | $8.43 |
| 5GBps High Speed USB 3.0 To 2.5″ SATA 7 + 15Pin Hard Drive Adapter 3TB Hard Disk | USB to SATA adapter, might be overkill | eBay | 2 | $7.43 | $14.86 |
| 7pin SATA 3.0 male to male port adapter Straight Angle SATA 6Gbps Convertor card | Adapter for media dashboard SATA ports | eBay | 2 | $10.22 | $20.44 |
| DTECH Short USB 3.0 Type A to A Cable Male to Male High Speed Data Cord (9.8-Inch, Black) | For USB to SATA adapter that is likely overkill | Amazon | 2 | $5.96 | $11.92 |
| Stainless Steel M3-.50×6 | SSD Mounting | Ace Hardware | 2 | $0.45 | $0.90 |
| Stainless Steel M3-.50×10 | Case Screws | Ace Hardware | 4 | $0.59 | $2.36 |
| Stainless Steel #4 x 3/8 | Tray and bracket screws | Ace Hardware | 6 | $0.15 | $0.90 |
| Component Tray | Hold majority of components | Grams of plastic | 174 | $0.02 | $3.48 |
| Media Dashboard Bracket | Restrict movement of media dashboard | Grams of plastic | 17 | $0.02 | $0.34 |
| Ring for USB Hub Input | Spacer to hold | Grams of plastic | 1.12 | $0.02 | $0.02 |
The total cost for the build as seen was $365.57
The USB Audio adapter that i didn’t use cost $6.75. The biggest single expense for this media bay was the 2 TB SSD which made up almost half the total cost of the build.
For the parts, see this page on Thingiverse.
Final Thoughts
Overall, I am extremely happy with the outcome of this build. The whole process took much longer than I anticipated but the final result is absolutely fantastic.
After several months of having companion device in operation, I think the SATA ports and Molex connector on the front could have probably been dropped from the design. I rarely use them so the cost of the individual parts, time and effort taken to make it all happen hasn’t really paid off. I also didn’t end up using the audio ports on the media bay, I can’t say I miss those either.
All that said, no regrets there as the whole thing was a fun process for sure.
As for these two machines… things… They bring a sense of retro-modern computing joy to my workspace. Even though the newness has worn off, the sheer enjoyment for using them has not.
References
Commodore 64 Impostor | My Retro Computer mini-ITX Computer
Internal Mounting 3D models on Thingiverse.com
Leave a Reply