
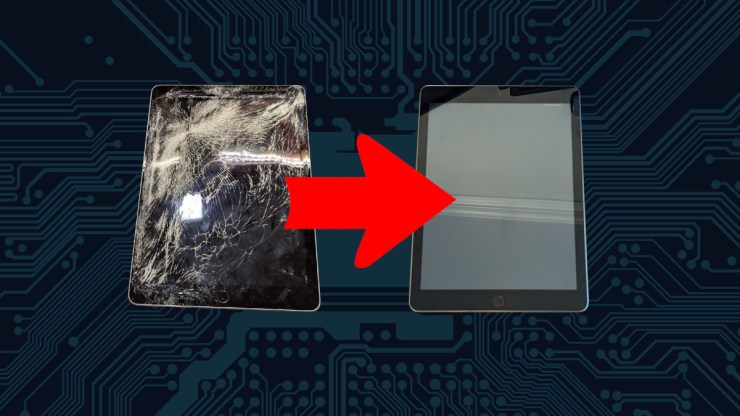
I am not what you would call a fan of Apple products. I believe that they are very user hostile, specifically in the area of right-to-repair arena. Consumer electronics should be built with repair and maintenance in mind so that we minimize the amount of e-waste we produce. Repairability should absolutely be encouraged for consumers that are willing to take it on. It doesn’t have to be made easy but it should be built into the design of the device like Framework does with their laptops and Valve does with the SteamDeck. These should be the norm, not the exception. Regardless of the hostility Apple has against repairing and upgrading their devices, I decided to take on replacing the digitizer of this iPad 6, which was essentially on its way to being e-waste. With the help of iFixit, their guide and kits, I decided this more difficult repair and here is my review of the process.

Hardware Evaluation
The first step was to evaluate the hardware to see if it was it even worth fixing. Although I realize that small bit is a foregone conclusion but do take in mind, before you decide to fix something, you do have to determine of the process is worth the results. This is something you need to determine for yourself. From a corporate perspective, my employer did not find the repair of this worth the cost as a used iPad is cheaper than the cost of repair.

My attitude was, I have never successfully fixed any tablet before and the cost of replacement parts was less than $40 so this was worth the risk of failure. If I attempt repair and it fails, the experience was worth the price of admission. Since the LCD did light up and the digitizer did still, amazingly work, actually work quite well regardless of the shattered face, I was willing to take on the task.
As a bonus, I did have the help and encouragement of my kids to fix this so that they could have a “new” toy. Not for free of course as they did participate in much of the process, especially the tedious portions.
iFixit Resources
The first place to check on the Internet for repairing devices today has become iFixit. They are not the only place but they are generally the first place I go to see if there is a guide because the articles are so well written. The guide is laid out with the right number of pictures to get the job done.
https://www.ifixit.com/Guide/iPad+6+Wi-Fi+Front+Panel+Assembly+Replacement/107618
This also gives you the links to find the parts so you have the option to buy the whole kit. This kit is the digitizer and the tools to effectively disassemble, prepare surfaces and assemble the device.
https://www.ifixit.com/products/ipad-6-screen-digitizer
The cost of this kit was $45 for the tools and digitizer. Just as an aside, the tools included in this kit will absolutely be used once again for other repairs.
I should note that there isn’t a set of steps for assembly, just work your way backward through the guide and do what you did to assemble it but in reverse.

I did also buy the “Clampy – Anti-Clamp” but the screen was so bad that no tricks actually worked to help with the separation process. This is not a fault of the tool or any of the tips offered to make this work effectively, this is entirely due to the fact that the screen was so shattered that no amount of clamp force or layers of tape were going to make for effective clamping suction. I could, however, use this for another project at another time, for sure.
https://www.ifixit.com/products/anti-clamp
$25
I also purchased adhesive strips for the digitizer but this was not necessary. The kit includes this and I either misread or didn’t understand that this was the case. The cost for these adhesive strips was $7, not a huge loss and should I decide I need to take the digitizer off for some bonkers reason, I can put it back together with the help of these.
https://www.ifixit.com/products/ipad-air-ipad-5-ipad-6-adhesive-strips
Repair
I am not going to review all the steps involved in fixing the iPad 6 as they basically worked just as the guide suggested, I would, however, like to describe the bits that tripped me up and suggestions for doing the repair yourself.

My first note is that the iOpener which is used for heating the device gently to loosen the glue was just not adequate for me. It was necessary but didn’t work for my on its own. I did use my soldering rework station hot air “gun” to provide additional heat. I didn’t have it any hotter than 200 degrees Celsius as to not cause damage to the iPad. This was also helpful when removing the bits of glass left over as I pulled the digitize off.
Where I had to stray from the directions was the separation portion. I followed along in the heating and separating but I had to use many more wedges to hold the glass away as it was incredibly flexible in it’s broken state.

Because the glass was so broken most of the time in this process was cleaning all the shards of glass out and cleaning the surface of the majority of the gunk left behind the iPad chassis. The iFixit kit has a great tray for keeping the incredibly tiny screws in to better keep track of the bits as you remove them.

The included tweezers of this kit is the huge winner here. Everything from handling the tiny screws to picking out bits of glass, kept these tweezers in the hands a lot.

The other part of this repair that was fiddly and quite nerve wracking was the home button portion. I failed to take pictures of this in detail but you have to be sure to put that thing in place while not getting the new rubber gasket stuck onto what it shouldn’t be stuck onto.

Before removing the backing of the digitizer adhesive, I did test that the screen and digitizer were properly assembled and working. Surprisingly, this was a success though after reviewing the guide and my pictures, I did miss a step.

I didn’t put that tape back in place that goes to the home button. I’m not about to take the iPad apart to fix that but I completely forgot about it in my excitement of putting this back together.
Another, very, time consuming portion of this repair was cleaning the LCD and digitizer of any bits of dust or fuzz from the cloth I used to do the cleaning. There was some sort of film on the LCD that caused a haze which might be due to the environment that this was being used. The digitizer also received some fingerprints from us as we were doing the testing and there was a slight bit of stubborn, sticky, residue from the packaging process in the middle of the screen that just wouldn’t clean off. After many long periods of time of cleaning and cleaning again and cleaning again and following up with some more cleaning the job was done and I could do one final test before pulling off the backing to the adhesive on the frame. It was all a success!

But not a complete success as I did notice a flaw in the corner. There appears to be a kind of bubble but I do not know where this is. I don’t know if ti is in the digitizer itself or something between the screen and the digitizer. Regardless, you do not see it when the screen is on, at all, so I still call this a complete success!

What I Like
iFixit is a fantastic resource for repairing your electronic devices. They not only provide the guides but the parts to get the fix completed successfully.
There is enourmous satisfaction in reparinging broken devices. I especially like the fact that I repaired a tablet whose manufacturer would prefer you did not. I sort of consider this to be a kind of act of defiance against Apple and there is a lot of satisfaction there too.
I like that I have a working iPad 6. I won’t use it much but I do have one that works and works quite well now. It does need a case to protect it from the handling of children but especially me.
What I Don’t Like
It is an Apple product and although I do find the company is incredibly innovated at times, does create an interesting product, they have terrible shelf-life or more accurately, when they fall off the shelf. They seemingly have no desire to keep their products from the e-waste bin at all and would never buy one of these or anything they make new due to their terrible product design decisions. I will, however, take a broken one for free and attempt a repair just to see if I can indeed use it within my Linux dominant environment.
Cleaning up the shards of glass was miserable and it took a few sticks of glass into my fingers before I was smart enough to put on gloves. I did have safety glasses on the whole time but I should have been quicker with the gloves.

Final Thoughts
If I were an engineer, designing the iPad and I had final say on the design, I would make several changes. The first would be screws to hold the tablet together. A good design would not require a heat gun and an iOpener to replace the digitizer. A small frame, held in place by a series of screws would do a much better job and would also keep devices like this in service much longer and out of the e-waste bin. Sure, it may cost you one or two more mm of thickness but that would be worth the economic and environmental benefits.

I am torn on whether or not I would do this repair again. I give it a strong maybe but I would have to be motivated. I would not do this repair if I didn’t have my lab and workbench to do it. This is not a task for a ktichen table to do at a whim unless you are a person of incredible talent and patience. I don’t believe I want to be that person known for fixing iPads. I’m glad I can do it but I don’t want to generate the experience of doing so many that I get good at it. I will leave that for those that love Apple products.
Ultimately, this was worth the price of admission. I am glad I pulled this off the shelf and worked with my kids to make this functional again. It was a mostly good experience with a great result. Mostly, I am glad I defied the will of a giant, greedy, right-to-repair-hostile corporation and kept this tablet from the e-waste processors. I don’t believe I would have even cared to do this if not for the fact that KDE Conenct now works on iPads. This is another win here because there is another crack in that walled, Apple, garden, freeing it from those artificially imposed limitations into a world of Linux freedom.
References
https://www.ifixit.com/Guide/iPad+6+Wi-Fi+Front+Panel+Assembly+Replacement/107618
Framework 13
SteamDeck
Leave a Reply