
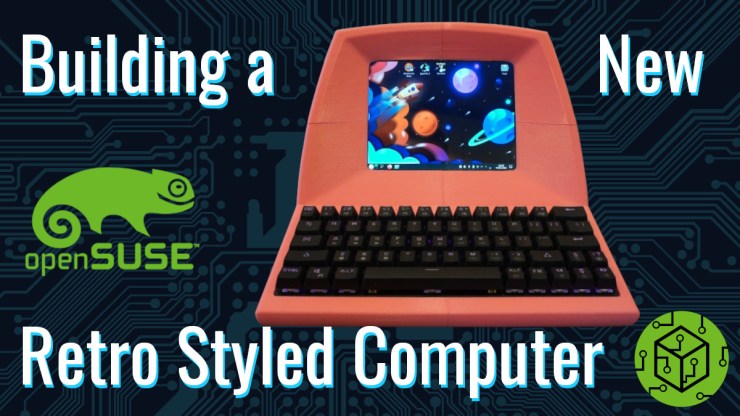
Computers are a lot more fun when they are personal and have a bit of personaltity to them. You can’t get much more personalized than 3D printing your very own retro styled computer. This was all inspired by watching an episode on the YouTube channel, Retro Recipes, where LadyFractic built herself a retro computer, my daughter wanted to build a computer for herself. I wasn’t sure how serious she was on it but she kept watching the two part series over and over again which indicated to me that this was a project that had to be completed. When I asked what color she wanted, her face lit up and she said “pink” that cemented the deal for me. We are making one of these in pink and I think it is going to look pretty darn cool.
Bottom Line up front: Yes, it indeed looks cool and I’m glad we did it. You can watch the video of its construction along with the difficulties that it brought along. It was well worth the time and effort and it might be the coolest computer in the house. It is most certainly the sturdiest machine.
Printing
In total, this took over 190 hours of printing using 2.1 kg of Pink PLA+. I did set the infill to be 40% because of my concern about how much abuse the machine would take. It is still probably a bit excessive but I have no regrets there.
The total cost in PLA+ for the printing was $72. A bit salty, really.
https://www.amazon.com/dp/B01EKEMD38

Assembly
Assembling the case was quite easy and straight forward, following the directions on the Thingiverse page for assembly was easy and quite enjoyable. The only portion of the assembly that does require you to pay attention is the top two pieces and hatch. Ensure you are assembling the hatch with the structure.


Components
Once the case is complete, there are some components that are necessary to make this build happen.
Keyboard
This is a DIERYA DK63N 60% USB and Bluetooth mechanical RGB backlit gaming keyboard. It is rather reasonably priced at $38 from Amazon.com.
https://www.amazon.com/dp/B092DBQVZV
8 inch Screen
I have found similar screens on other sites for cheaper but I do not know with absolute certainty that it will work the same so I am not going to add links for those. This one from Amazon.com will work. This was the most expensive component at $79
https://www.amazon.com/dp/B07V7GGWMM

Battery Backup
One of the key items in this build was to be able to pickup and move this machine to another location. It was impossible to do so with the prescribed list of components by the creator of the Callisto II. Battery backup was the core reason that I strayed and took the design my own way.
The downside of this backup system is that the battery doesn’t keep the machine for very long. It is somewhere between 30 minutes to a half hour. It wouldn’t be much to replace this with a larger battery but I think I may be straying away from using the Raspberry Pi, in the long term.
I would say that this is a very good battery back up system and does the job of supply enough power to the computer as well as the monitor.
This cost $39

USB-A 2.0 Extension cable
I only needed one of these cables. The Pi4 has two USB 2 ports, one of which is claimed by the Keyboard.
This came in a set of two for $10. I am sure I can find a use for the other at some point.

USB A 3.0 Extension Cables
A Raspberry Pi4 has two USB 3 ports. I wanted to have both of these accessible in the back of the computer.
These cost $17 for two cables.
USB C Extension Cable

Very importantly, I had to be able to power this machine and it made sense to just use the USB C input just as it is intended for the Pi4 and make it available in the back.
This cost $14
5mm Single-Pole-Single-Throw Toggle Switch
I already had a switch of this kind on hand but you can get these for less than $1.
There are some other things I used to make it work from parts lying around that you may have lying around. The wiring and connector for the power switch was something I had lying around that I modified and soldered in the toggle switch.

For information on the components used and the cost of the components download the attached worksheet (ODS format).
CAD Work
One of the key design features for my modified Callisto II build was the back plates for the case. Instead of having a USB hub pressed up on the back, I used surface mount cables screwed in to the panel.


The final result has made the back of the computer look absolutely fantastic.

Purpose
Building something just to build something is gratifying but even more valuable when the thing you build serves a purpose. This machine, although looks cool, is not just decoration for the kitchen table, this is a machine that is a practical educational support appliance running openSUSE Tumbleweed. It is being used for typing papers, typing tutors and other open source edutainment software.
The Pi4 inside is enough to play some simple games, browse the web and even enjoy a YouTube video or two. I can very easily connect to my self-hosted media server and although the speakers are a bit weak, there is always the bluetooth option of pairing to a larger set of speakers. Lets be fair. Laptops are not really known for having great sound anyway.

Next Steps
For starters, I want to replace the Raspberry Pi4 with something like a NUC or laptop motherboard. I really want more computational power. The problem with using a Raspberry Pi computers like a general desktop device is that they lack a lot of the “quality of life” enhancements that have been around since the introduction of the ATX standards. As a consequence, things like suspending to RAM is not an option. The other problem with ARM is the lack of x86 compatibility. As much as I enjoy the Raspberry Pi, it is a bit like going back in time 30 years or so.
I need to find some other ways to extend the USB ports in such a way that makes more efficient use of the backplate space. It would be nice to squeeze in an HDMI connection and possibly an SD Card reader in the back of it yet.
Final Thoughts
After spending almost $280 on supplies and components for this Retro computer build, I am very happy with the results. The case looks good, the choice of keyboard is perfect and the monitor is just big enough. This computer is absolutely a joy to use and was ultimately worth the time and effort to build.
I think there is room for improvement on the machine. For starters, the computing unit needs to be upgraded to something x86 based. What exactly, I am not sure but I do not want to lose the mobile aspect I enjoy with it now.
If you have a 3D printer, a soldering iron and quite a bit of patience, this is a great project to do that leaves you with something truly practical.
References
Retro Recipes, LadyFractic Printing a Retro Computer on YouTube Part 1
Retro Recipes, LadyFractic Finishing her Retro Computer on YouTube Part 2
Building a New Retro Computer CubicleNate YouTube Video
Callisto II Thingiverse Case 3D files
Callisto II Thingiverse Back Plate 3D files
Leave a Reply