
I bought into the 18v Porter-Cable cordless tool system in 2009 with the 4-tool Combination kit. It came with a drill, reciprocating saw, circular saw and a rather nice flashlight. I got these tools to conduct some renovations on rental property and they all worked very well. At that time, I was a HUGE Porter-Cable fan as they enabled me to add to this system more very useful 18v tools. As more tools were being released, more were going to be available for this system and I had a project for every one.
Many Happy [Porter-Cable] Years Later
When renovating house in 2014, I broke the Forward/Reverse Button while drilling a 4 inch hole for the purpose of routing a vent for a bathroom. In my late-night cramming to complete the project, I was obviously not at my peek, exhausted and not ensuring my drill remained coaxial to the hole I was drilling. While cutting the hole, the drill jerked, my thumb hit the Forward/Reverse Button, something snapped and the button moved back and forth freely with a limp rattle. I planned to fix it after my family vacation but it ended up just sitting… for a long time.
I brought the drill to work with the intent of taking advantage of the tools in the model shop to conduct the repair. Like so many other good intentions, they start well and just end up sitting, and it did until a coworker made a comment. “Hey Porter-Cable! I love Porter-Cable! Why is it sitting there?”
I had some time at that moment, waiting on feedback from an engineer to some design of a some part or system so I decided to investigate the true failure of the drill as I explain how the drill ended up at my desk.
 The drill was held together with 8, easily accessible, screws but there was some significant resistance at separating the two halves of the drill. After applying what I would consider an unreasonable amount of force, the drill exploded in my hands.
There really isn’t much to a drill. It is basically a handle with a trigger designed around a motor and gear box.
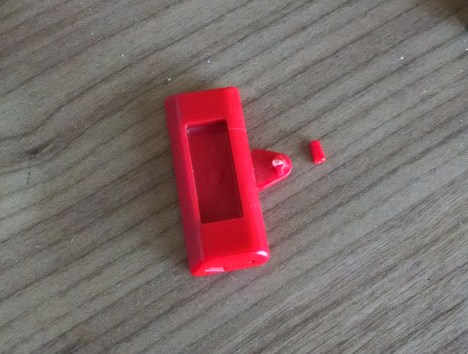
Upon examining the Forward/Reverse Button, it was very apparent what exactly had failed: a very small pin that protruded from the component simply sheered off. It was no longer able to move the selector mechanism at the bottom of the motor assembly. I wasn’t sure what the best solution was for fixing the switch so I took the part and its broken bit to the model shop to consult one of the many individuals, all of which are more adept and providing an effective solution.

The model maker I took it to, looked at the parts and said that the first course of action he would try would be to use an industrial strength version of Loctite with an accelerator. The two parts allowed me to layer and harden some more of the glue around the base for added strength. I was a bit skeptical but the model maker assured me that the rapid-prototypes that are made in sections are held together quite successfully with this adhesive. Worst case, it doesn’t hold up and I try something else so there was nothing to lose.
Reassembly
While reassembling the drill, I discovered what was causing the resistance to disassembly. A little RF theft prevention tag stuck on the inside of the base of the drill.

I am fascinated by the placement of the RF theft prevention tag. I would like to see how they actually stuck that in that location on the assembly line. I imagine it was placed after the halves of the drill were fascinated together… but how?
The only real challenge to assembly of this drill was this black wire that seemed to be oddly short, compared to the other wires. It required some extra persuasion to get the wire in a place that would not pinch it when fastening the halves together. I couldn’t see how the wire was routed from the factory as the drill sort of spilled into pieces when I was forcing it apart.

Assembled and Put To Work
I employed the drill this weekend and it works fantastically, once again. I am glad to have two functioning drills again among the rest of my 18v cordless, Porter-Cable tools. Even though this isn’t powered by one of those new, fancy brushless motors, it has the torque to do the job, every time.

Final Thoughts
Unfortunately, after purchasing every 18v Porter-Cable tool, they decided to abandon the 18v platform in favor of this new 20v MAX platform. It annoys me because “20v” is technically 18v so there is no additional power gained. My 18v tools are now an abandoned platform which is quite irritating after investing all that I did in the platform. My batteries are fading and I am not prepared to replace all these tools as that would be a poor economic decision. I also do not want two different battery systems. It is unfortunate that there isn’t an upgrade path to the 20v MAX line from the 18v tools, such as battery adapters or something to encourage me to start buying the newer line of tools. So now, I am at a decision point. I either need to buy some new or refurbished batteries or possibly replace the cells in my battery packs. I have projects that do require some new tools but do I go with Porter-Cable or do I abandon the brand just as they abandoned me with the 18v line?
What’s the Linux connection? There isn’t. This is just tech I use to get other, non Linux-y, things done.
References
3D Printed 20v Battery to 18v Porter-Cable Tool Adapter
Your description of what happened just before the switch went “limp” is exactly what happened to me just now with my own (circa 2009) PC 18v drill. So I wonder — did your repair hold up? did you decide to go with the 20v system for a new drill? Because I have to decide whether to buy a new 20v drill and keep the 18v system for the other tools, or buy a used 18v drill.
My drill was purchased in 2009 from Lowe’s. The 18v line has really been a fantastic set of tools and I have not a bit of regret in purchasing them. I certainly got my use out of all my Porter-Cable tools. Unfortunately, there wasn’t an upgrade path provided to go from 18v to 20v so upon evaluating where to go, I ended up going with the DeWalt 20v cousin. I did keep the drill I fixed as well as a few other Porter-Cable 18v due to their uniqueness. At some point, I’ll build a 20v DeWalt battery to 18v Porter-Cable.
Is there a replacement reverse button available from portercable
I am not aware of a replacement direction switch from Porter-Cable. These have also been out of production for a while.
I drilled out a little hole where the nub broke off and super glued in part of a nail shank. so far so good.
Thanks for your help! My switch broke after 4 years of good use. Followed your instructions. Drill was easy to disassemble. I drilled a tiny hole in the switch made a fitting metal hook and glued it in. Seems stronger than regluing the broken plastic piece. Hope it works!
Sounds like your fix will hold up longer than mine. I will certainly implement your fix, should mine fail on me. Thanks for the feedback!